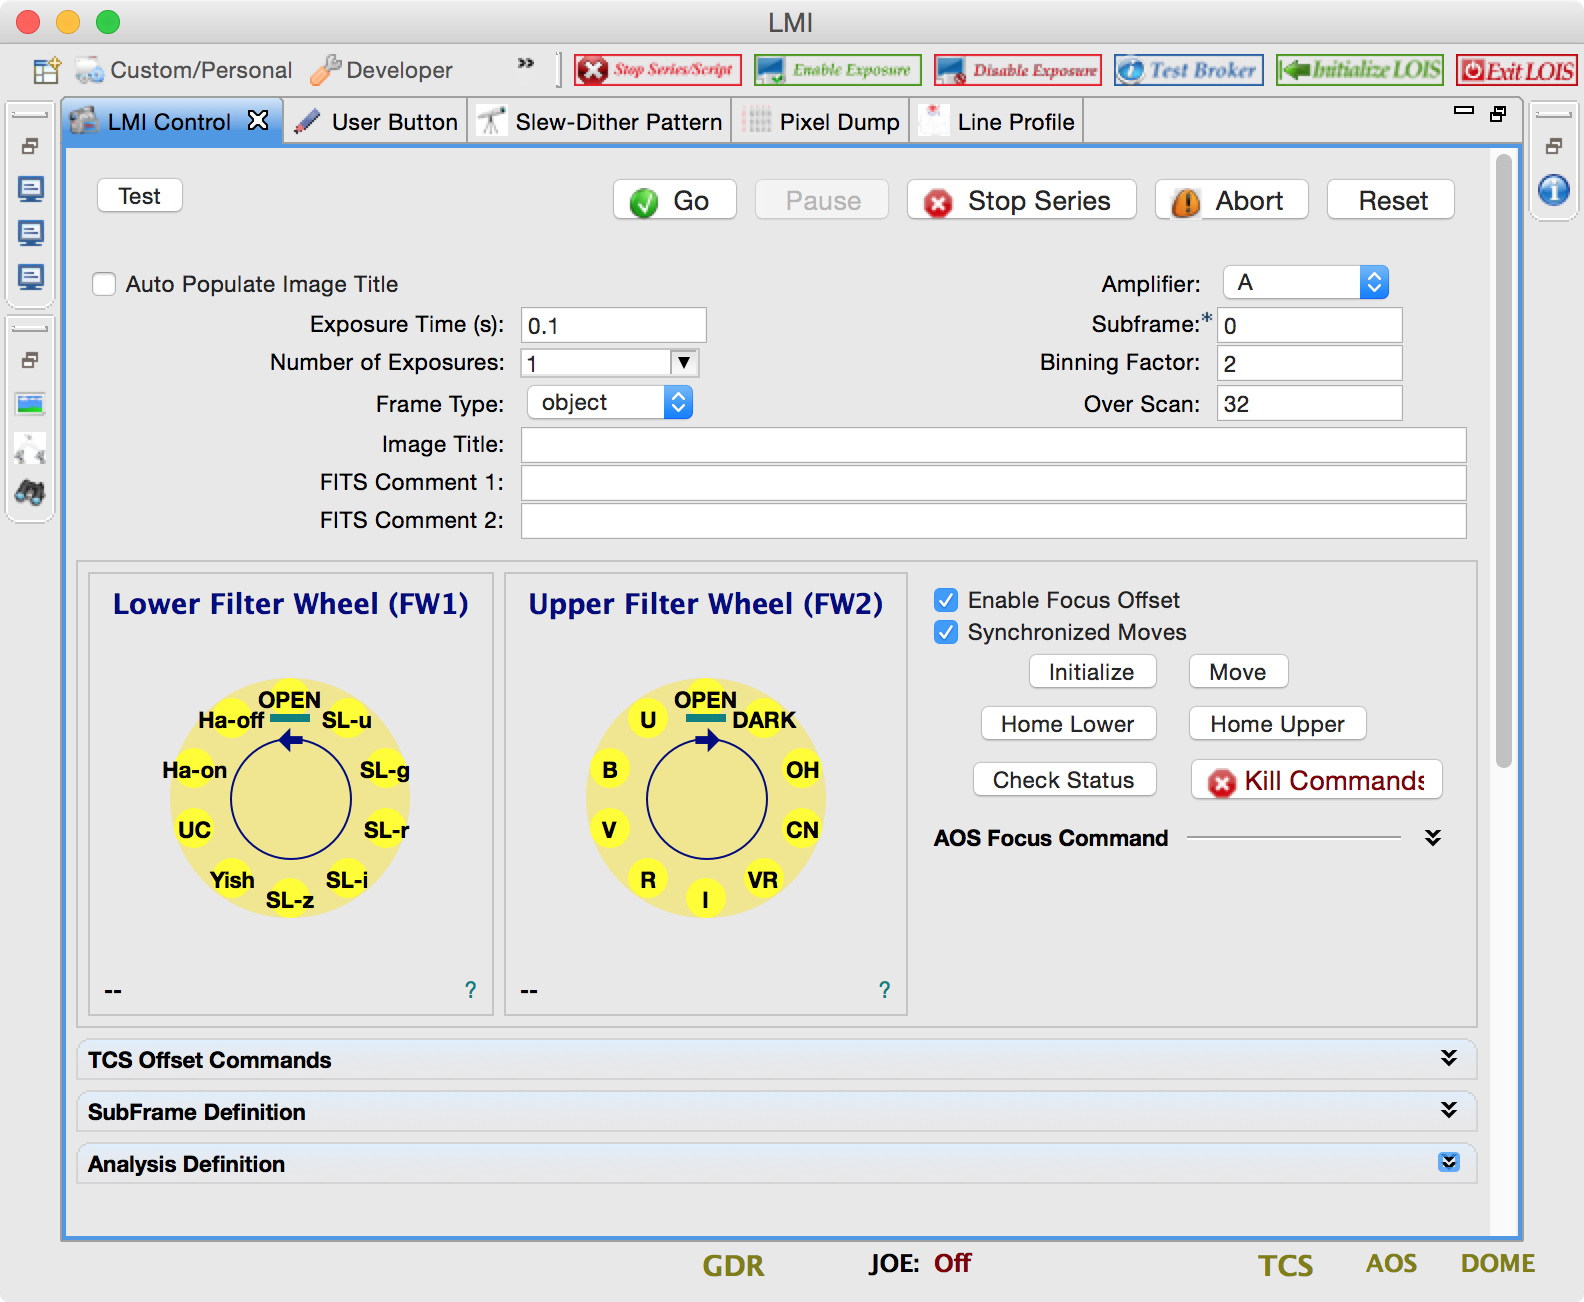
Below you see the LMI Camera Control view which is the primary way for controlling and commanding the LMI. In addition to direct control of the CCD, some other functions related to the instrument can be performed from this view for convenience. For instance, the TCS Offset commands can also be issued by the TOs on the TCS control panel but it is probably more convenient for the astronomer to issue them directly. The main functions available in this view are:
- Setup & Starting an Exposure
- Selecting Filters
- Issuing the AOS Focus Command
- Issuing a TCS Offset Command
- Defining Subframes
- Setup & Issuing Analysis Command
Tooltips are available for most fields.
Setup & Starting an Exposure
The top section of the view allows the observer to setup and initiate an exposure command. The most common parameters for the exposure command are exposed in this view but for full control of the CCD, one needs to go to the Engineering Mode Control view.
The top row contains the buttons for initiating or stopping the exposure:
- Test - initiates the exposure in test mode so the image is saved in test.fits. This file will be overwritten the next time the button is pressed.
- Go - starts an standard exposure based on the values of the text fields on the view. The image will be saved in a named and numbered file based on the parameters set in the info view.
- Pause - Not implemented yet.
- Stop Series - This will stop the series when the number of exposures is greater than 1. The current exposure will continue.
- Abort - Aborts the current exposure but does not affect the series.
- Reset - Changes all the text field values back to the default startup values which are read from the config file.
The text fields are self-explanatory. One thing to remember is that subframe = 0 means full frame.
Selecting Filters
This section of the view allows selection of the filter and issuing the move command. LMI has two filter wheels with 10 positions in each. Position 1 is reserved for HOME and is OPEN. The filter wheels move in in one direction only and the motion of the two are in the opposite directions. For instance in the lower filter wheel, moving from 1 to 2 is a short relative move of 1 position. On the upper filter wheel the same move is a long relative move of 9 positions.
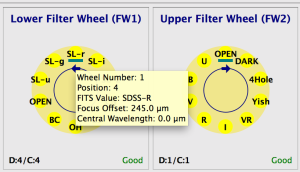
Below each filter wheel widget there are labels for demand and current position along with the status of the detent. Each filter position will also display a tooltip:
There are also 2 check boxes which are checked by default:
- Enable Focus Offset - If checked, an AOS focus offset command is sent to the AOS to compensate for the change in the filter. The value is based on the current and demand filter positions. Each filter has an associated focus offset value with the OPEN position having a value of 0.
- Synchronized Moves - Automatically moves the secondary filter wheel to HOME/OPEN position when the primary filter wheel is moved.
There are also 6 buttons associated with the filter moves:
- Initialize - Initializes the two OMS card axes associated with the two filter wheels. This should only be necessary when the cube is power cycled.
- Move - It sends the command to the OMS card to initiate the move. Clicking on the widget does the selection and sets up the command but it does not send the command out.
- Home Lower & Home Upper - Convenience buttons for homing the two filter wheels. These are very useful if the widget gets confused about where the filter wheels are.
- Check Status - Another way to confirm the position of the filter wheels without homing them. It sends the "Check Detent" command to both axes.
- Kill Command - It sends the "KL" command to both OMS cards which kills all active commands on the card. The command should only be used if there is a strong suspicion of a runaway move command.
AOS Focus Command
The AOS focus command is an accordion UI element (collapsible content) which allows the observer to send a focus offset command to the AOS.
If a filter wheel move fails, the code loses track of the relative AOS focus offsets and one should reset the value. So the procedure is to go back to the same filter configuration that the focus script was run and re-send the value obtained from the script using this element. Homing the filter wheels will NOT set the proper focus value in such a case.
TCS Offset Command
The built-in offset command in the TCS is absolute and has three modes; TPLANE, SIMPLE, and PA. The relative offset command is a LOUI implementation by issuing an absorb command immediately after the offset command. It is advisable not to use the relative offset as it is unsupported for cases such as guided offsets.
Sending the clear command is equivalent to sending 0,0 as the parameters and the absorb command causes the pointing center to change to the current location and clears the current offsets in the TCS.
The hand paddle allows one to send incremental offsets for each of the three modes. Pressing one of the hand paddle buttons will increment the current offset parameter and send it immediately to the TCS. The hand paddle only works with absolute offsets.

The tooltips on the labels show the appropriate units for each parameter. The hand paddle text also shows the relevant units for each mode.
Subframes
xpix & ypix are the center pixel values and the xsize & ysize are the number of pixels you want for the subframe being created. Then you just have to pick a number for the subframe and make sure to put the correct subframe number in the box on the upper right before taking the image. By default subframe number of 0 is reserved for full size image.
Setup & Issuing Analysis Command
???